Kabocha nimono (simmered Japanese pumpkin)

We love root vegetables, so easy to handle and always delicious. Usually we roast a variety of them with minimum effort – some olive oil, salt and pepper and they result in a tray of shimmering rainbow. That’s a typical western version of handling root vegetables. The Chinese homes usually serve it as an accompaniment to a main ingredient in soups or stir fried. The Japanese however, take much effort in making sure the full flavours are represented.  This pumpkin is a good example,  although the dish was meant to be eaten as a side ( pardon the quantity we made it looks like we made a lot,hmmm actually we did, one large plate 😬😬😬. Like I’ve said, we do love our root vegetables) yet the dish receives as much attention to detail as a main dish. Not that it require that much effort, just sufficient for the flavours to burst through those golden bars.

Recipe

1/2 a kabocha or japanese pumpkin
1 piece of kombu, about a postcard size
1 tablespoon mirin
1 teaspoon sugar
1 teaspoon soy sauce

In a small saucepan add kombu to 4 cups of water. Slowly bring to boil. This will make a simple dashi stock.

Meanwhile, wash the kabocha thoroughly, scoop away the seeds but leave the skin on. The skin serves to hold the flesh and adds texture to this dish. Cut the kabocha into chunks. Arrange them skin-side down in a medium pot, preferably in 1 layer.

Combine the mirin, sugar and soy sauce in a bowl. Add one cup of the freshly made dashi stock and stir to dissolve the sugar. Pour the mixture over the kabocha chunks in the medium pot. Add another cup of dashi, or two cups, just to cover the kabocha.

Bring to boil and simmer for 15 minutes or until a fork can pierce into it, tender but not mushy. Adjust the taste of the simmering broth if necessary. Turn off the heat and let it stand lid closed for 30 minutes. The kabocha will continue to cook and absorb flavours while it cools in the pot (so do not overcook it before turning off the heat).

Serve the dish either slightly warm or at room temperature. Garnish with spring onions if you wish.

Note:Buy a nice and ripe kabocha (get those that are already cut into half, it’s easier to see if they are nice!). Because of the simplicity of the ingredients, careful execution is required and achieving the correct texture is of utmost importance.
Save the left over dashi for another use, such as making tamagoyaki (see the sushi post)


The girl and her Udon

So ever since we went to Japan (Osaka & Kyoto) earlier in May ( I know it’s been reaaaaaallly long since we posted something🐢🐢🐢),there’s been a new favourite choice of food in this house. Well by default, favourite is really just one girl’s erm demand. And actually we are not even sure we got to eat that much udon back there. Really, with so many choices- Ramen (ippudo! Ichiran! How can we miss these establishments,okonomiyaki,takoyaki, abdundance of sushi and sashimi…just to name a few…

But today’s post is about udon. Yup? thick strings of slight chewy noodles which has become a favourite with our 4yo and she has been, still is asking for udon if she’s asked what she prefers for lunch/dinner. I think she can even have udon for breakfast if she could. Unfortunately most of the udon we can find here are really mediocre, not to mention not worth the average $12-$15 per bowl (or the calories for us adults). Quite terribly made stock too. Lucky for us, doting daddy is always ready to take in the challenge, and it’s not that hard ( I think) to make than to find a decent bowl of udon.

Recipe

1 postcard size kombu

A small handful of bonito flakes

2 packets of udon

1 carrot, thinly sliced into rounds or flower-shape

2 tomatoes

A big handful of mushrooms

Japanese fish cake, sliced

Spring onions, chopped

Make a dashi stock: add kombu into a pot with 1 L of water. Slowly bring to boil. Remove the kombu and add the bonito flakes. Let simmer for 1 min. Turn off the heat. Sieve away the bonito flakes. Add a tablespoon of good quality soy sauce. Cover the lid.

Preheat oven, turning on top heating element only, at high heat, abt 220degC. Tear up the mushrooms if necessary, toss in oil and salt. Grill in oven until caramelised at the edges.

Boil a fresh pot of water. Add carrot and simmer. Cut a cross at the base of the tomatoes and blanch in the boiling water for 10s. Remove the tomatoes. Add udon and loosen with chopsticks. Cook for about 2 mins or till the udon is al dente. Pour over a colander and wash the udon with cool running water to stop the cooking and remove excess starch.

Peel the tomatoes, Drop them into the pot of stock. Bring the stock to boil, add sliced fishcake, and then half the spring onions. Taste and adjust if necessary

Portion udon into serving bowls (2 big or 3 small potions). Pour hot stock over and arrange ingredients decoratively on top. Remember the mushrooms! Serve remaining spring onions on the side.

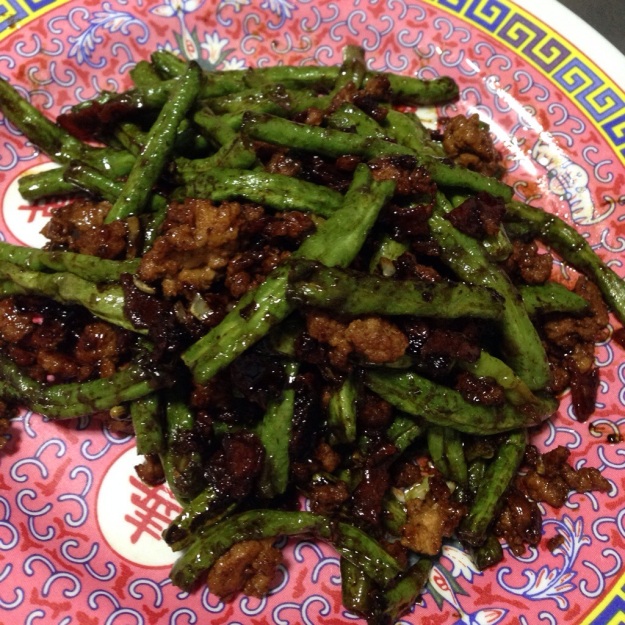
干煸四季豆

20140614-132548-48348055.jpg

Recipe
Long beans, one bunch, cut into 3-inch sticks
Minced pork, 100g
Bacon, chopped, 50g
Garlic, 3cloves, minced
Dark soy sauce, 10ml or to taste
Oyster sauce, 1 tablespoon or to taste
Rice wine, 1-2 tablespoons
Pepper
1 teaspoon corn flour, mixed with 2 tablespoons water

Heat about 1cup of vegetable oil in a wok. Shallow-fry long beans for 1-2 mins. Remove, drain oil and set aside.

Mix the seasoning with the rice wine in a small bowl.

Pour away all but one tablespoon of oil from the wok. Fry the bacon till the fats render out. Add minced pork and garlic, fry for 2 minutes, breaking up the meat as you go along.

Add the seasoning/wine mixture. Bring the heat to high. Once bubbling, add the long beans, stir quickly to coat beans with sauce. Give the cornflour/water a quick mix and pour into wok. Giving everything a quick stir again, taste, salt if necessary. Dish.

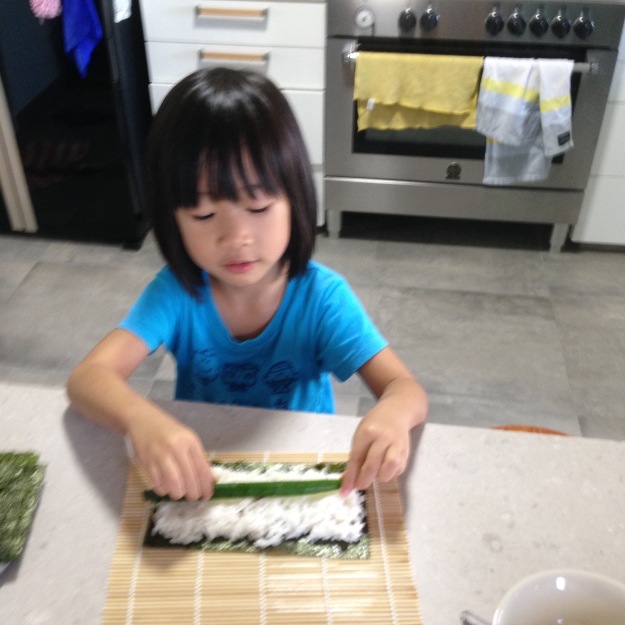
Xiaoliang makes Sushi

Step 1: Mise-en-place and smile:)

Sprinkle vinegar seasoning on rice

“Cut” vinegar seasoning into rice.

Place a piece of seaweed on bamboo mat.

Lay a bed of rice, and put a strip of cucumber on.

Start rolling! Press inwards with strong(er) hands…

This is how it should look. Time to pose!

Making another one, tamago this time. Yeah!

I’ll pack this for lunch. Anyday. 
Recipe:

For the sushi rice, and many other japanese recipes, justonecookbook is a good go-to site.  See http://www.justonecookbook.com/how_to/how-to-make-sushi-rice/

For tamagoyaki, watch this delightful video by Taro: https://www.youtube.com/watch?v=kEhKeh6m0zY


Cheesecake, with an intentionally burnt top


Cheesecake is one of my early indulgences I remembered I indulged. Lazy days after junior college classes (or even in university) were spent at coffee bean, ice blended and a Chicago cheesecake on the table. Which probably cost about the same as now ($6?) come to think of it. The portions then at coffee bean seemed bigger. We could share a slice of cake for hours. Or maybe it’s beacause we savoured it much slower than. Then I remembered how my home economics class used to teach us a no bake version which was bleah.

Anyway, this recipe is fail proof. Might have been the recipe that got zzz baking. Considering how the ooooos and ahhhhhhs yummy sounds edged him to try others. It’s  still a firm favourite of mine.  

Recipe for 9 inch cake 

15 digestive cookies, finely crushed
60g butter, melted 

500g Philadelphia cream cheese
150g sugar
150ml sour cream or yogurt
3 eggs
1 tsp vanilla extract
1 tablespoon flour
1 tablespoon lemon (or orange) juice
Some lemon (or orange) zest

Combine crushed digestives and melted butter in a mixing bowl. Press into 9 inch cake tin (with removable base). Put into freezer.

Preheat oven 160 deg C. Put 2 wire racks, one in the middle and one at the bottom. Pour some water into a baking tray and place it on the lower rack. This will “half steam, half bake” the cheesecake.

Put all the rest of the ingredients into mixing bowl of a stand mixer. Mix till well combined and smooth. (If using yogurt and the mixture curdle slightly, it’s fine!)

Pour mixture into cake tin and bake for 40 mins.

To achieve slightly burnt top, switch to top grill setting in oven for the last 5-10 mins. Keep an eye!

Remove from oven, cool in room temperature for an hour or 2. Cool in fridge for at least 4 hours before removing from tin and cutting. 

Homemade Japanese curry from scratch

Recipe

2 large onions, sliced thinly
1/2  tsp sugar
1/2 tsp sea salt
Half a head of garlic
1 knob of ginger
2 carrots
2 potatoes
4 chicken drumstick+thighs
3 tsp of garam masala
1/2 tsp turmeric powder
1/2 tsp chilli powder
1/2 cup mirin
2 tbs tomato paste mixed with 2 cups of water
Dash of dark soy sauce

In a medium pot, on low heat, caramelised the onions with some oil, sugar and salt. Stir occasionally.

While caramelizing the onions, prepare the rest of the ingredients. Mince the garlic. Chop carrots and potatoes into bite size chunks. Remove bone from drumsticks and thighs, set aside. Slice boneless chicken into bite size pieces and season with salt and pepper.

When the onions are almost caramelised, add chicken bones, carrots, potatoes, garlic and ginger. Add more oil to move things around if necessary. Turn heat/fire to medium high.

Add spices and chicken meat. Brown the chicken briefly. Add mirin to deglaze.

Add tomato paste and water, and soy sauce.

Bring to simmer and let it cook in low heat for 30 minutes. Taste. Add salt, pepper, water, chilli if necessary. If you like a thicker and more starchy curry, mix a heaped teaspoon of cornstarch into a small bowl of water, then add the starchy water slowly into the curry until the desired consistency is reached.

Remove the chicken bones. Serve with steaming white rice.

Spaghetti with tomato, basil and white cheese

It seems like summer recipes are all over the Internet now. And the highlight ingredient of all those colourful sun soaked vegetables has to be the bright as sunshine tomatoes. I even saw an article on the Hwacheon tomato festival in South Korea, where everyone celebrates the harvest of this rotund fruit. Imagine kids jumping into pools of tomato juice, for fun, yup. Exactly.

While we enjoy summer all year round, we don’t get the fun or abundance of picking fruits and vegetables in the backyard, throwing the excess for a tomato spa party. We do get a better selection of fruits and vegetables in the market (my mum’s explanation that the warmer the weather, the better the harvest). So we have been getting pretty sweet (imported) watermelons, cherries and better looking vegetables. Yes, there are good looking vegetables that I can’t help but admire and end up buying.

I so love the simplicity of this dish. Brings food back to the basic taste. Ok, canned tomatoes were used but that’s hardly the point. These tomatoes worked really well. Right. I can’t imagine if we had ready access to farmers market. 


Recipe (serves 3)

240g spaghetti

90g white cheese (I used a Danish one. Feta, mozzarella or even Brie will be great as well.)

1 can chopped tomatoes (use a good Italian brand such as Cirio, just 20% more exp, but 200% better than Hunt’s)

12 fresh cherry tomatoes

30g basil

5 cloves garlic

Mince garlic, add to a pot with some oil and fry over low heat. 

Pluck the basil leaves and throw the (large) stalks into the pot. 

Pick about 12 nice basil leaves and set aside. 

Shred or chop the remaining basil leaves and add to the pot. Give the basil and garlic a quick stir. Keep a keen eye on them. At the faintest hint that the garlic is beginning to brown, add the canned tomatoes. Stir. Half fill the can with tap water and add to the pot. Bring the sauce to a simmer, stirring occasionally. Salt and pepper to taste. 

Bring a pot of salted water to a rolling boil. Add pasta and cook for 3 mins less than the stated time on the packet. 

Meanwhile, slice the fresh cherry tomatoes into halves and add to the simmering tomato sauce. Control the fire such that the sauce will reduce and thicken slightly at the time the spaghetti is ready. 

Use a pair of tongs to transfer the spaghetti to the pot of sauce. Add a ladle of spaghetti cooking water to the sauce (important!). Toss the spaghetti in the sauce. Bite into one spaghetti to make sure it’s cooked. If not, let it simmer in the sauce for one more minute or so, adding pasta cooking water if necessary.

Plate the spaghetti, slot in small chunks of cheese and basil. Drizzle some extra virgin olive oil, good sea salt and freshly grounded pepper. 

Homemade sio bak 


I’m sorry to have made you hungry.

But how to not get hungry over this?

Slabs of moist pork with perfect crackling skin. I can almost forget about overindulgence in these fats, some say it’s collagen anyway so it’s ok right?

No it isn’t?

Ingredients

Pork belly
Coarse sea salt 
Fennel seeds
Five spice powder
Onions, thinly sliced
Mirin or rice wine
White or apple vinegar

Use about 1 tbs of coarse sea salt, a tsp of fennel seeds, and a pinch of five spice powder per kg of meat.

The onions are for making a bed for the pork belly to sit on.

Ground the fennel seeds with half of the coarse sea salt in a pestle and mortar. Combine with the five spice powder.

Poke the skin of the pork belly all over with the tip of a sharp knife. Rub the spice mix all over the meat. Lay skin side up and rub the remaining salt over the skin. Let it stand in air for 3 hours, or in the fridge for 12 hours. If time is an issue, get a clean fan to blow the meat for an hour. 

Preheat oven to 240 degC. Don’t worry, we will turn it down later. 

Lay a bed of sliced onions, the length and width of the bed being that of the pork belly. Pour some mirin or rice wine over the onions. Place the pork belly on the bed of onions and bring then into the oven. 

Turn the heat down to 170degC. 

Let the pork belly roast for an hour to an hour and a half, depending on the size of the meat. 

If you had found it difficult to poke the skin before roasting, you can poke it with a pin or toothpick 10mins after u started roasting. The skin is much more giving now. 

After an hour or so, the meat is cooked. Now it’s time to crisp the skin! Turn the oven setting to top grill and increase the temperature to 220degC.

Take the meat out of the oven and sprinkle vinegar in the skin. Return to the hot oven and broil until ALL the skin is charred (yes, black!). Keep a watchful eye as this will not take long!

Carefully remove the meat from the oven. Let it stand for 15 mins. 

Now use a serrated knife the scrape the skin to remove the black top, revealing the beautiful golden brown crackling skin below. Carefully bring the meat onto a chopping board and let it stand for another 15 mins.

Slice a serve.

Cookie monster cupcake with molasses dark chocolate chip cookie

cookie monsters, ready to invade xiaoliang’s school

Have you seen anything cuter? Especially when it’s made for a class of 20 three year olds’ monster party??!!

Xiaoliang certainly was proud of her daddy’s work,the teachers said she made sure each if her classmate had one monster and they were enjoying the cake.

Recipe

Use your favorite cupcake recipe. I did a simple vanilla cupcake with a cream cheese frosting

Decoration
Eyes: Marshmallow (cut into appropriate size) and chocolate pearls.
Fur: Dessicated coconut and blue coloring.

Molasses dark chocolate chip cookie
125g butter, melted and lightly browned for deeper flavours 
2/3 cup raw sugar
1egg
1 teaspoon vanilla extract
2 tablespoons molasses
1.25 cup all purpose flour
1/2 teaspoon baking soda
Pinch of teaspoon salt
1cup of dark chocolate chips (I used callebaut 70.4%)

Melt and brown butter slightly. Meanwhile mix flour, baking soda and salt in a bowl. In another (large) bowl, mix sugar and molasses. Add browned butter into sugar mixture and beat for 2 min. Add vanilla. Add egg. Beat for a min. Add flour mixture, stir to combine. Finally, stir in the chocolate chips. 

Form balls of dough using a ice cream scoop. Can freeze the unbaked cookie dough balls or bake immediately in a preheated 180deg Celsius oven for 12-13 mins.

zzz’s way of eating a cookie

Pork loin braised in milk


Recipe

750 g pork loin

4 cloves of garlic

A few sprigs of rosemary

A stalk of lemongrass, bruised with a pestle

Half a medium onion

Assorted veggies such as carrots, potatoes and cherry tomatoes 

White wine/mirin/vermouth 

Milk,  abt 1 cup

Season pork with salt and pepper.

Heat up a Dutch oven. Add oil, garli, lemongrass and rosemary.  Add pork and sear on all sides. If garlic and rosemary starts to get dark, remove them and set aside. If not just leave them in. Once pork is seared on all sides, remove and set aside. 

Add all veggies, salt and sauté until soft. Add more oil if necessary to keep things moving. 

Add a splash of alcohol and let it bubble. 

Push the veggies to the side and put the pork back in. Add milk.

Let everything come to a low simmer, cover and keep it that way for about an hour. Add more milk if necessary. 

Turn off the flame and leave it to stand  for 15mins. Take the pork out and let it rest for another 15 mins. 

Slice the pork and serve with the pan juices and veggies.